Kintsugi is a beautiful and enjoyable craft, but one thing you must be careful about is urushi rash (dermatitis). When urushi (Japanese lacquer) comes into contact with the skin, it can cause an allergic reaction.
▼ Urushi leaves

Outside of Japan and China, urushi trees do not grow naturally, so many people may not be familiar with urushi rash. However, its symptoms are similar to those caused by poison ivy. Both plants belong to the same botanical family and contain urushiol, the compound responsible for allergic reactions.
▼ Poison Ivy

In this article, I share my personal experience with urushi rash over a two-week period, featuring real photos of my arm to help you understand what to expect.
In the latter half, I provide more detailed information about urushi rash and how to prevent it, so you can enjoy kintsugi safely.
Table of Contents
- My Urushi Rash Experience (Days 1–15)
- My Urushi Rash Timeline
- How to Prevent Urushi Rash
- The Connection Between Urushi Rash, Poison Ivy, and Mango Allergy
- Final Message
My Urushi Rash Experience (Days 1–15)
Day 1 – The Itch Begins
One morning, I felt an itchy sensation on my wrist.
"…Could this be urushi rash?" I immediately took a photo.

I had experienced urushi rash before in the summer, but I didn’t expect it to happen in winter, too. During this time, I was busy with the opening of our Ebisu kintsugi studio and TV interviews, often working late into the night.
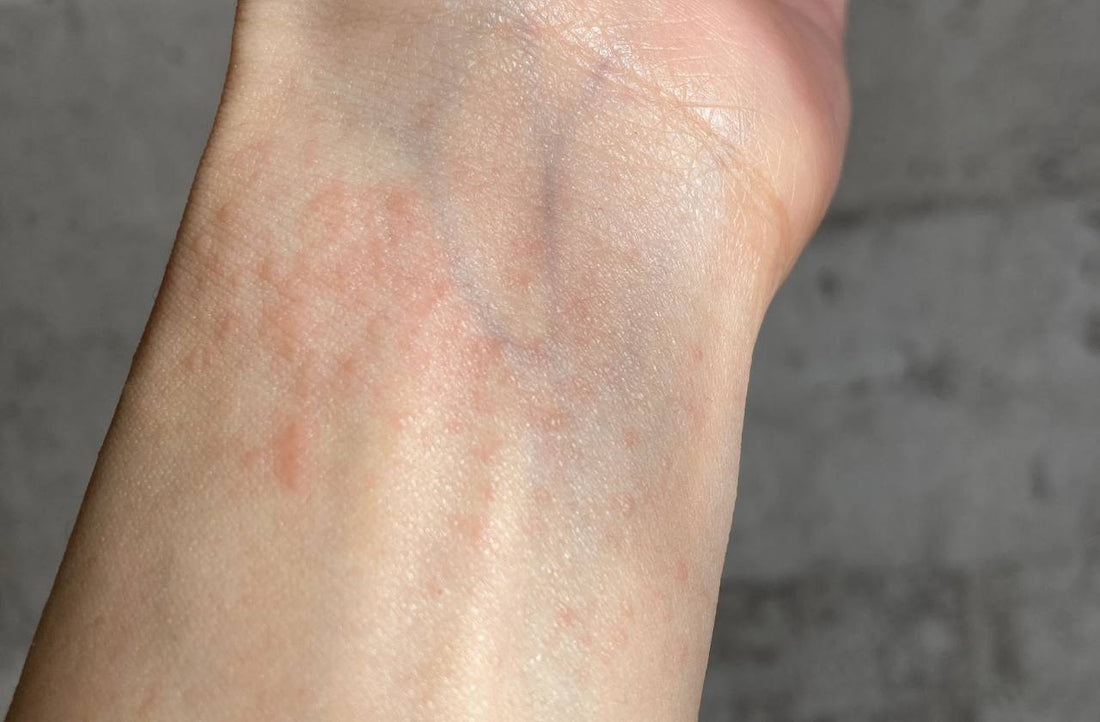
I wasn’t sure exactly when I came into contact with urushi, but it was likely several days earlier. Urushi rash doesn’t always appear immediately—it can develop days after exposure, often in areas where the skin is thinner or more sensitive. This time, the rash started on my wrist and later spread to the base of my thumb.

Day 3 – The Rash Spreads
By the third day, the rash had worsened.

Small blisters appeared on my wrist and the base of my thumb, and the irritation spread to the back of my hand. The itch became intense, resembling hives.
Day 4 – Redness and Steroid Treatment
By morning, the blisters had turned into red, inflamed patches, and the itch and pain were at their peak—this was the worst stage of the rash. I regretted not going to the doctor or applying any medication earlier, thinking that if I simply avoided working with urushi, the rash might heal on its own.

I decided to apply a strong steroid ointment, prescribed previously by a dermatologist. I had learned from past experience that weaker steroids were ineffective, so I opted for a stronger treatment from the start.
As a licensed pharmacist, I have knowledge of medications, but I strongly advise you to consult a doctor before using any medication.
Day 6 – Is the Steroid Working?
After three days of steroid use, there was no visible improvement. The rash had stopped spreading, but the redness and blisters remained.

Unfortunately, despite already having urushi rash, as a kintsugi artisan, I couldn’t stop working on my craft. While continuing my kintsugi work, I accidentally got urushi on my hand again, causing a new outbreak. I rushed to the dermatologist, who prescribed a cream-based steroid that was easier to apply over a large area.
Day 7 – Slight Improvement

The itching persisted, but the inflammation had started to subside slightly. In the morning, when my body was cool, the redness was less intense. But after a bath or when my body warmed up, both the itching and redness became more intense. In addition, any friction from clothing caused discomfort.
Day 10 – Starting to Heal

After a week of steroid treatment, the rash finally began to heal. The red patches were shrinking, and the itching had decreased. However, areas that developed the rash later were healing more slowly.

Day 14 – Almost Healed
Two weeks had passed, and while some redness remained, I could finally go about my daily activities without discomfort.
Day 15 – Fading Marks but No Itch

Visually, the areas that had intense redness still show some discoloration, but the itching has almost completely subsided. It may take another month for the marks to fade entirely, but they seem to be gradually disappearing.
My Urushi Rash Timeline
- Peak Symptoms: Around Day 4-7
- Improvement Starts: Around Days 9–10
- Itching Subsides: Around two weeks
- Completely Healed: After about three months (no scars or marks remained)
How to Prevent Urushi Rash
The best way to avoid urushi rash is to prevent direct contact with urushi.
As recommended in the Tsugu Kit manual, always use rubber gloves and wear long sleeves when doing a project involving urushi in order to avoid any direct contact with the skin. We also recommend tying your hair while doing kintsugi.

Urushi rash is not limited to raw urushi; it can also be caused by black urushi, bengal-red urushi, white urushi, glass urushi, and even urushi-based pastes such as kokuso and tonoko. In addition, be careful when handling not only urushi products but also sanding powder and sanding water. They may look dry but might still be sticky or not fully hardened. Therefore, avoid direct contact with urushi surfaces, mixed pastes, tools used for mixing or applying urushi, sanding powder, and sanding water.

Urushi dries at different speeds depending on temperature and humidity. It’s safe—and even better—to let it dry longer than the time in the instructions.
However, even with precautions, urushi can sometimes get on your skin. If this happens, immediately apply oil (such as rapeseed, canola, or any type of vegetable oil) to dissolve urushi, being careful not to spread it. Then, completely wipe it off with a tissue. If you touch other skin or objects with the area that came into contact with urushi, even a small amount can spread everywhere.

Urushi can also transfer to objects like door handles, desks, and bedding. Be cautious about touching anything during/after working with urushi.
The intensity and duration of the skin reaction vary by individual, but it can gradually worsen and last for weeks.
Special Cases: Airborne Urushi Rash

In rare cases, some individuals may have a severe allergic reaction and can develop skin inflammation on their face and body from airborne urushiol, even without direct contact. If you experience any discomfort on your skin or eyes, or get a skin rash, discontinue use immediately and seek medical attention.
Since many doctors are unfamiliar with urushi, explaining that it is similar to poison ivy and contains urushiol may help them understand your condition better. In my case, my doctor prescribed a steroid cream, but treatments may vary depending on the medical professional.
The Connection Between Urushi Rash, Poison Ivy, and Mango Allergy
Urushi rash occurs because urushiol penetrates the skin, triggering an immune response that causes inflammation, itching, and blisters.
Interestingly, people who are allergic to mangoes should be cautious with urushi, as mangoes belong to the same botanical family. Mango skin contains compounds similar to urushiol, which can cause rashes around the mouth and on the hands when touched.

Mangoes also contain substances similar to latex, so people with latex allergies should also be careful.
Other plants in the same family include:
- Cashews
- Pistachios
- Ginkgo nuts
These foods may trigger cross-reactions in people who are sensitive to urushi.
What Is Cross-Reactivity?
Cross-reactivity occurs when the immune system mistakenly reacts to substances with similar structures. If you have had allergic reactions to plants in the urushi family before, take extra precautions when working with urushi.
Final Message
Urushi rash can be unpleasant and even severe, but despite this, people have continued to use natural urushi lacquer in kintsugi for centuries. The reason is simple: once cured, urushi is completely safe for use on tableware, making it a trusted and durable material.
By taking proper precautions, we can safely enjoy kintsugi without suffering from urushi rash. Many people who think they won’t get a rash end up with symptoms because they neglect safety measures. Please learn from my experience and be extra careful!

I hope this article helps you enjoy kintsugi safely and with confidence.
2 comments
Dear Brekton,
Thank you very much for your comment!
We are very concerned to hear that you developed a rash.
We hope our article has been helpful to you.
Please take good care of yourself.
This article is incredibly helpful. I just started practicing kintsugi and unfortunately broke out in a rash a week ago. Thank you for documenting your experience. I feel a little less crazy now that I know it’ll last a while even with strong meds.